top of page

AYAH MAHMOUD
DESIGN PORTFOLIO

Kitchen Cosmo I
Project Overview
The Kitchen Cosmo is an AI-powered kitchen appliance that explores how physical interfaces can create more engaging and functional interactions with generative AI. This project moves beyond a traditional chat-based AI experience by embedding a large language model within a physical device. By using a camera and a tactile control panel, users can generate personalized recipes tailored to available ingredients, dietary restrictions, serving size, cooking time, skill level, meal type, and a unique "Cosmotype" that guides the recipe's creative direction.
The device combines computer vision, custom electronics, and AI-driven recipe generation to transform cooking into a playful, exploratory experience while encouraging users to interact with AI as a tool rather than a conversational companion. Through iterative prototyping, prompt engineering, and user testing, the Kitchen Comso investigates how embodied AI systems can make complex technologies more approachable in everyday life.
Team
Ayah Mahmoud, C. Jacob Payne
Teaching Staff
Marcelo Coelho, Sergio Mutis, XDD Dai
Skills
Embodied AI
Interaction Design
Electronic Design
Industrial Design
Sketching
Rapid Prototyping
Color and Material Finish
Arduino
Fabrication
AI API Integration
CAD | Rhino 8
Prototyping
HTML, Javascript, C++
Prompt Engineering
3D Printing
Laser Cutting
Project Journey & Timeline
Developed over 6 weeks, Kitchen Cosmo moved through four broad phases: (I) Early research and ideation to define scope, user needs, and aesthetic direction; (II) Parallel prototyping of hardware, software, and physical form through cardboard models; (III) System integration bringing electronics, code, and structure together into a functional prototype refined through 3D-printed iterations; (IV) A final fabrication phase covering PCB production, finish testing, and full assembly into the finished device.


Defining the Problem
To start this project, we held conversations with the cooking hobbyists in our lives with varying levels of interest and skill level to understand various pain points involving cooking, recipes, and the kitchen space, and identified four distinct recurring issues...


~30% to 32% of food is thrown away every year in US households


Finding recipes with your exact available ingredients can cause frustration


Finding recipes on personal devices can cause uneccesary mess


In most homes, kitchen space remains limited for large appliances
This led to the question: What if we could create a tool that could help users reduce food waste by creating personalized recipes with the ingredients that are readily available, while being optimized for a kitchen space?
Precedent Study: A Brief History of Kitchen Computing
For form and function, the Kitchen Cosmo was heavily inspired by a home appliance called the Honeywell Kitchen Computer that was developed in 1969 by Honeywell. Marketed as one of the first attempts at bringing computing into the kitchen space, it contained a Honeywell H316 microcomputer that saved recipes and performed basic mathematical functions to help balance household expenses.
Despite its ingenuity, none were ultimately sold because it was inaccessible to users. Instead of making computing accessible to home cooks, it was expected that home cooks would become computer programmers. It required users to take a three-week coding course and to manually upload recipes via binary code, in addition to having a steep price point of $10,000 (roughly ~$90,000 today).

Honeywell Kitchen Computer, Neiman Marcus ad | Image: Computer History Museum
By understanding the shortcomings of the Honeywell Kitchen Computer, the project was grounded in the importance of designing for ease and usability.
Moodboarding & Sketching
In the next steps, we looked for inspiration for the form factor and interactions in existing and speculative retro appliances and created mood boards.
Form Factor
We were drawn to the style of 90s home appliances and created moodboards of retro designs that caught our eye, from espresso and coffee machines, refrigerators, ovens, alarm clocks, and fans. Most of the devices were in bold primary colors, complemented by a mix of metal materials and glossy finishes that draw the eye and beautify the home. We enjoyed the lack of harsh, straight edges on the devices, which ideally made them easier to hold and move on a countertop.


Camera Interaction
Control Panel
Since early concepts of the device began to explore ingredient recognition as a potential interaction, integrating a camera became an important consideration. However, growing concern around the perception of digital surveillance raised questions about how a camera might be incorporated in a way that felt intentional, privacy-conscious, and spatially efficient.
To gain other necessary information to create a recipe, such as serving size, meal type, and allotted time, we decided to use tactile components such as dials, switches, and slide encoders, rather than a screen, to allow easy, low-tech navigation and to call back to the retro-futuristic aesthetic.
We intended to integrate these preferences on an easily viewable control panel on the main body of the device. It was important for us to workshop recipe preferences so that the panel didn't seem too congested or overwhelming.


For inspiration, we looked at mechanisms that already felt natural to home devices such as hinged stand mixers and lamps.


For inspiration, we gathered images of control panels on sound systems and kitchen devices like toasters and oven dials. These examples gave us ideas on how to label everything cleanly.
Recipe Printing and Storage
To coincide with the tactile nature of the device, we wanted the recipes to be physically printed out. We took inspiration from original cookbooks in being able to physically keep recipes over time, while avoiding the unnecessary mess of using touch screen devices to view a recipe, and imagined them printed with a small printer similar to a receipt.

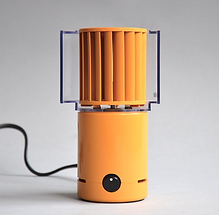


To keep the recipes long-term, we imagined some sort of storage mechanism attached to the device! We looked at methods of paper storage that seemed interactive, and drew inspiration for a turning tube from the motion of film reels after taking a photography course. Visually, inspiration was drawn from a retro table fan design.
Sketching
 Sketch 1(10 min sketch) Reflects a lightweight device that stands on two wires, with an adjustable angle on the head. The wire bottom allows for underneath storage, but doesn't allow for a shut camera. |  Sketch 2(20 min sketch) Inspired by a toaster form, with a camera that raises up and allows for outwards extension. The control panel sits on one side, and the camera closes shut. |  Sketch 3(20 min sketch) Reflects inspiration from an airfryer in form, where the head lifts and extends outwards again. Hand holes on either side for lifting and moving the device. |
|---|---|---|
 Final Sketch(30 min sketch) High fidelity sketch done after the first round of 3D printed prototypes. Played with the silver embellishment designs, and drafted the recipe capsule. |  Sketch 4(10 min sketch) Low fidelity sketch of a final form created after the first cardboard prototypes. Inspiration of the form comes from a combination of the previous sketch with a more streamlined form reflective of a refridgerator. |
Prototyping
Low Fidelity Cardboard Prototypes
Before developing the final sketches, a round of fast, low-fidelity cardboard prototypes was used to explore even more forms inspired by specific products on our moodboard. Using cardboard and painter's tape, we each took 15 mins to make models that were focused on gauging object size and testing the various interaction types we considered for the camera.

I. Kuerig Inspired
Interaction: The head extends upward, increasing the camera's field of view. However, ingredients would need to be placed directly beneath the device and within a limited viewing area.
II. Ms. Cafe Inspired
Interaction: A pull-out camera arm looks down onto ingredients from above. While this expands the viewing area, the fixed height limits taller items and makes reading food labels more difficult.
III. Standing Mixing Head Inspired
Interaction: An angled camera head increases the readable area while allowing food labels to remain visible. It also offered the simplest fabrication path, with the ability to close completely and use magnets for preset viewing positions.
3D Printed Prototypes
Next, we started 3D modeling and printing prototypes. All models were modeled using Rhino 8 and printed using a Bamboo P1S printer in multiple parts.

I. Prototype I: Initial low-fidelity mockup used to establish scale, proportions, and visual direction. Marker sketches directly on the print helped explore features before moving into CAD.
II. Prototype II: Focused on interaction design, testing the control panel layout, ergonomics, and the first usable recipe storage tube concept.
III. Prototype III: Integrated finalized electronics housing, circuitry pathways, hinges, and magnet placements. This iteration also included the first finishing tests and an improved recipe storage mechanism.
IV. Prototype IV: Fully functional final prototype featuring the complete control panel, metal trim, and finished red gloss exterior. The device underwent extensive sanding, painting, and finishing to achieve its final appearance.
Interface Design & Interaction
To begin to flesh out the interface, control panel, and recipe generation, we brainstormed on a FigJam board, mapping out the key questions a personalized recipe needs to answer. These ranged from practical pre-cooking details (ingredients, time, equipment) to post-meal reflection, the value of potential added features, and the sensory experience of cooking itself.

![250517_UI [Converted].png](https://static.wixstatic.com/media/5e2339_30c459c2dcad4c46bc79783bcff99ac3~mv2.png/v1/crop/x_324,y_280,w_1026,h_1239/fill/w_369,h_450,al_c,q_85,usm_0.66_1.00_0.01,enc_avif,quality_auto/250517_UI%20%5BConverted%5D.png)
We landed on seven essential aspects we wanted to expand upon through the interface and physical interaction.
We defined the desired effect of each question on recipe generation and defined the data input, which led to decisions about the electronic components used.
We then organized these recipe preferences into a central control panel using the accompanying electrical components and devised a final layout inspired by our initial moodboard.
Cosmotypes
We used a similar workshop strategy to choose the cosmotypes, which are a variety of creative cooking archetypes that shape the style, mood, and personality of the dish.
Scavenger → minimal, practical, clever with scraps
Experiment → reimagine classics, unexpected combos
Surreal → abstract, surprising, artistic
Spectacle → impressive, layered, fine-dining feel
Gather → communal, hearty, shareable
Nostalgic → comforting, familiar, traditional
Electronic System Design

For the electronics, we centered the system around an Arduino Micro microcontroller, and it first reads the recipe preferences from the control panel. The microcontroller then sends the inputs and the ingredients image from the webcam to a computer system running the recipe generation software. The software then makes the API call to OpenAI using our specific prompting to generate each personalized recipe. Once a recipe is generated, it is formatted and sent back to the Arduino, which triggers the printer to produce a physical copy. To troubleshoot the system, image capturing, and preference inputs during the development process, we built a simple front end on the computer.
Electronic Prototyping


We first connected the camera to our computer to test the ingredient identification, then worked on a breadboard prototype using electrical components readily available in lab for the control panel. To finish the system, we integrated the thermal printer and tested the printing format.
Breadboard Prototyping


Circuit Board and Final Control Panel


For the final version of the circuit board, we ordered the proper components and caps for the dials and switches, and laser-cut a thin sheet of clear acrylic and engraved the labels. After screwing in the electrical components with jam nuts into the interface, we then soldered all of the electrical components onto a double-sided prototype board. To clean up the wiring, we heat-shrunk and zip-tied all the wiring so that the circuit board sat flush against the left wall of the device with little to no loose wires.
Code

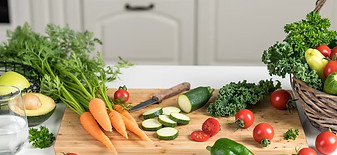
The code is organized into four stages: the Arduino reads physical inputs from the control panel, which are passed to a front end used for monitoring the process. From there, the back end takes over, making the API call to generate a recipe. The result is then sent back to the Arduino, which formats and prints it out.
Recipe Testing
Pre-Test: Medditerranean Bliss Chicken Bowl


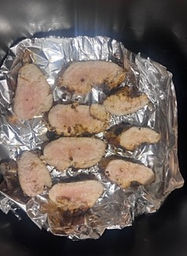
The first recipe test was conducted shortly after brainstorming the recipe inputs while deciding the interface and interactions. Using the OpenAI API playground, it gauged the LLM's recipe generation baseline before engineering a specific prompt for the machine.
rice
Feta cheese
olives
chickpeas
chicken
cucumber
tomatoes
avocado


Recipe Inputs
Available Ingredients: Rice, Feta Cheese, Olives, Chickpeas, Chicken, Cucumber, Tomato, Avocado
Available Time: 2 hours
Hunger Level: Very Hungry
Dietary Restrictions: No Gluten or Eggs
Equipment: Full Kitchen
Meal Type: Dinner
Sliced but Uncooked D:
Airfired until Edible
Generated Recipe, Instructions, and Additional Suggestions
Recipe Title: Mediterranean Bliss Chicken Bowl
Difficulty Level: Medium
Time: 1 hour 30 minutes
Full Ingredient List:
2 large Chicken Breaks
1 Sliced Cucumber
2 Sliced Tomatoes
1/2 cup of Olives
1 can Chickpeas
1 cup Rice
1/2 cup Feta Cheese
- 2 cups Chopped Kale
- 1 juiced Lemon
- 2 cloves Garlic
- Olive Ohio
- 1 tsp Dried Oregano
- 1/2 tsp Paprika
Instructions:
1) Prepare the Chicken: Marinate the chicken breast in half of the lemon juice, 1 minced garlic clove, olive oil, salt, and pepper for at least 20 minutes.
2) Cook the Rice: Cook 1 cup of rice according to the package instructions. Once cooked, set aside.
3) Cook the Chicken: Heat a pan over medium heat, add olive oil, and cook the marinated chicken breast for 6-7 minutes on each side or until fully cooked. Remove and let it rest before slicing.
4) Prepare the Vegetables: In the same pan, add a little more olive oil and sauté the remaining garlic until fragrant. Add kale and sauté until wilted. Toss the chickpeas with paprika, salt, and pepper, and add to the pan for a couple of minutes to heat through.
5) Assemble the Bowl: In a large bowl, layer the cooked rice as the base. Top with sliced chicken, sautéed kale and chickpeas, cucumber, tomato, and olives. Sprinkle feta cheese over the top. Drizzle the remaining lemon juice mixed with a little olive oil and oregano on top.
Additional Tips/Suggestions:
- For extra flavor, add a dollop of tzatziki or hummus
- If you prefer a spicy kick, sprinkle some red chili flakes
Side Dish Pairing:
- Warm pita bread or herbed flatbread
Drink Pairing:
- A refreshing iced mint tea or chilled glass of Souvignon Blanc.
Shopping List:
- Lemon
- Garlic
- Olive oil
- Dried oregano
- Paprika
Recipe Review
The first round of recipe testing produced a visually appealing dish with clear, well-structured instructions that were easy to follow. The recipe successfully incorporated sensory cues such as timing, aromas, and texture changes, creating a cooking experience that felt natural and intuitive. However, this test revealed several shortcomings. While the chicken developed a nicely browned exterior, it was surprisingly undercooked inside, highlighting the potential issue of the model underestimating cooking times for proteins. The dish was also flavorful but was a bit underwhelming and lacked depth, relying primarily on lemon, garlic, salt, and pepper while overlooking complementary spices such as rosemary, thyme, and cumin that find their home in Mediterranean dishes. These observations informed the beginning of our prompt iterations, leading to the addition of cooking safety guidelines and explicit instructions for the model to incorporate regionally appropriate seasonings and flavor-building techniques.
Final Prompt Test: Cosmotype Tests
In the next round of recipe testing, we focused on physically testing the cosmotypes' influence on recipe generation. We devised a test for experimental and nostalgic dishes using the same four ingredients to generate both a dinner and a dessert recipe.


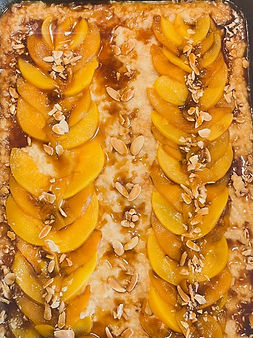

Peanut-Honey Glazed Salmon over Kale & Crispy Rice with Honeyed Peach Relish
Dinner
Experimental
Warm Rice Pudding with Honeyed Peaches & Peanut butter Swirl
Dessert
Nostalgic

peaches
honey
peanut butter
rice
The four ingredients we chose included items I had been wanting to use more creatively in my pantry. We felt that this range of ingredients allowed for possibilities for both a dinner and a dessert option.
Difficulty Level: Advanced
Time: 1 hour
Servings: 2
Full Ingredient List:
2 cups Cooked Rice
2 tbsp Smooth Peanut Butter
2 tbsp Honey
1 can of Peaches
2 Salmon Fillets
1 cup of Kale
3 tbsp Soy Sauce
1 tbsp Rice Vinegar
2 tbsp minced Garlic
Scallion
Roasted Peanuts
Chilli Flakes
Instructions
1) Prepare the Peach Relish: In a bowl, combine the diced peaches, peach syrup, rice vinegar, sliced scallion, and chili flakes. Stir well and allow the mixture to sit while preparing the remaining components. As it rests, the peaches will absorb the acidity and develop a bright, jammy flavor.
2) Make the Penut-Honey Glaze: Whisk together the peanut butter, honey, soy sauce, peach syrup, garlic, and rice vinegar until smooth. The glaze should have the consistency of warm caramel. If too thick, add a teaspoon of water.
3) Create the Crispy Rice: Break apart the cold rice with your fingers. Heat a large nonstick skillet over medium-high heat. Spread the rice into an even layer and drizzle lightly with honey. Allow the rice to cook undisturbed for 8–10 minutes. You should hear a gentle crackling sound and notice a toasted aroma developing. Flip sections of the rice and continue cooking for another 4–5 minutes until deep golden and crisp. Transfer to a plate and keep warm.
4) Cook the Kale: Using the same pan, add the garlic and cook until fragrant, about 30 seconds. Add the kale, soy sauce, and water. Cook for 3–4 minutes, stirring occasionally, until the kale softens but still maintains some structure and vibrant color. Set aside.
5) Glaze the Salmon: Pat the salmon dry. Then heat a skillet over medium-high heat and place the salmon skin-side down if skin is attached. Cook for 4–5 minutes until the fish begins turning opaque about halfway up the sides and releases easily from the pan. Flip carefully. Reduce heat to medium and brush generously with the peanut-honey glaze. Continue cooking 3–4 minutes, repeatedly spooning glaze over the salmon until it develops a glossy lacquered coating and flakes easily with a fork. The glaze should smell nutty, sweet, and slightly caramelized without burning.
6) Assemble: Create a bed of crispy rice in each bowl. Layer the sautéed kale alongside the rice. Place a glazed salmon fillet on top. Spoon the honeyed peach relish over and on the side of the fish. Finish with crushed peanuts, sliced scallions, and a pinch of chili flakes if desired.
Peanut-Honey Glazed Salmon over Kale & Crispy Rice with Honeyed Peach Relish
Difficulty Level: Advanced
Time: 1 hour
Servings: 8
Full Ingredient List:
3 cups Cooked Rice
1/2 cup Smooth Peanut Butter
2 tbsp Honey
1 can of Peaches
4 cups Milk
2 Egg Yolks
4 tbsp Peach Syrup
4 tbsp Sliced Almonds
Extra Honey (for serving)
Instructions
1) Prepare the Rice Pudding Base: Combine the rice, milk, and sugar in a saucepan and simmer for 10–15 minutes until thickened.
2) Temper the Egg Yolk: Place the egg yolk in a small bowl. Slowly whisk in 2–3 tablespoons of the hot rice mixture until smooth. Gradually whisk the tempered yolk back into the saucepan. Continue cooking over low heat for 3–4 minutes, stirring constantly, until the pudding becomes silky and lightly thickened. Do not boil.
3) Create the Peanut Butter Swirl: In a small bowl, combine the peanut butter with 1 tablespoon honey and 1 tablespoon warm milk. Stir until smooth and pourable.
4) Honey the Peaches: Slice the canned peaches into bite-sized pieces. Add them to a skillet with the reserved peach syrup and 1 tablespoon honey. Cook over medium heat for 5–7 minutes, stirring occasionally, until the peaches become glossy and lightly caramelized around the edges.
5) Toast the Almonds: Add the sliced almonds to a dry pan over medium heat. Toast for 2–3 minutes until fragrant and lightly golden. Remove immediately to prevent burning.
6) Assemble: Spoon the warm rice pudding into a serving tray. Layer the honeyed peaches over the top in a pattern, then swirl ribbons of the peanut butter mixture through the pudding using a spoon or skewer.
Warm Rice Pudding with Honeyed Peaches & Peanut Swirl
Recipe Reviews
Peanut-Honey Glazed Salmon over Kale & Crispy Rice with Honeyed Peach Relish
This recipe was absolutely delicious and stayed very true to its Experimental Cosmotype. There was a huge variety of flavors throughout the dish, from the sweet and sour peach relish, to the sweet, salty, umami-rich salmon, to the slight bitterness of the kale. The textures were equally successful. The crispy rice provided a crunchy base, the peach relish added softness and brightness, and the glazed salmon tied everything together with a rich, saucy finish. Every bite felt different, making the dish exciting to eat and encouraging experimentation with different flavor combinations. This recipe demonstrated the model's ability to create novel ingredient pairings that felt intentional rather than random.
Warm Rice Pudding with Honeyed Peaches & Peanut Butter Swirl
This recipe was good and remained faithful to its Nostalgic Cosmotype. As someone who grew up eating rice pudding as a post-dinner treat, it's heartwarming to see the model generate a reimagined version of a familiar dish. The recipe did an excellent job explaining more advanced cooking techniques, such as tempering egg yolks, and provided useful sensory cues to help prevent overcooking, such as describing when the almonds were properly toasted. One area for improvement would have been providing more context about why certain steps were important, such as why boiling the pudding or improperly tempering the eggs could negatively affect the final result. I also felt the dish could have been elevated with additional ingredients such as fresh fruit, butter, or cream, but the Nostalgic Cosmotype prompt description intentionally favored simplicity and familiarity over complexity.
Final Design


bottom of page